February 9, 2021

Aquafaba Peanut Butter Vegan Brownies

8:13 PM 0 Comments

I am not sure if I have ever posted a recipe using aquafaba but it is such a great trick to use for vegan baking!

Aquafaba is the liquids leftover from canned chickpeas and can be used as a binding ingredient or even a mousse/whip cream replacement!

It is creamy and frothy, tasting great in recipes but also on its own. In most recipes, you will need to whip it until it has formed soft peaks which can take a while so I recommend using a food processor or stand mixer. However, some recipes may called for just the liquid added straight in. This recipe uses the whipped version.


If you eat chickpeas often, this is an amazing hack so that you don't waste anything! If you don't often eat chickpeas, then I really recommend them. I've been on a chickpea loving spree lately and have been adding them to soups and other dishes.

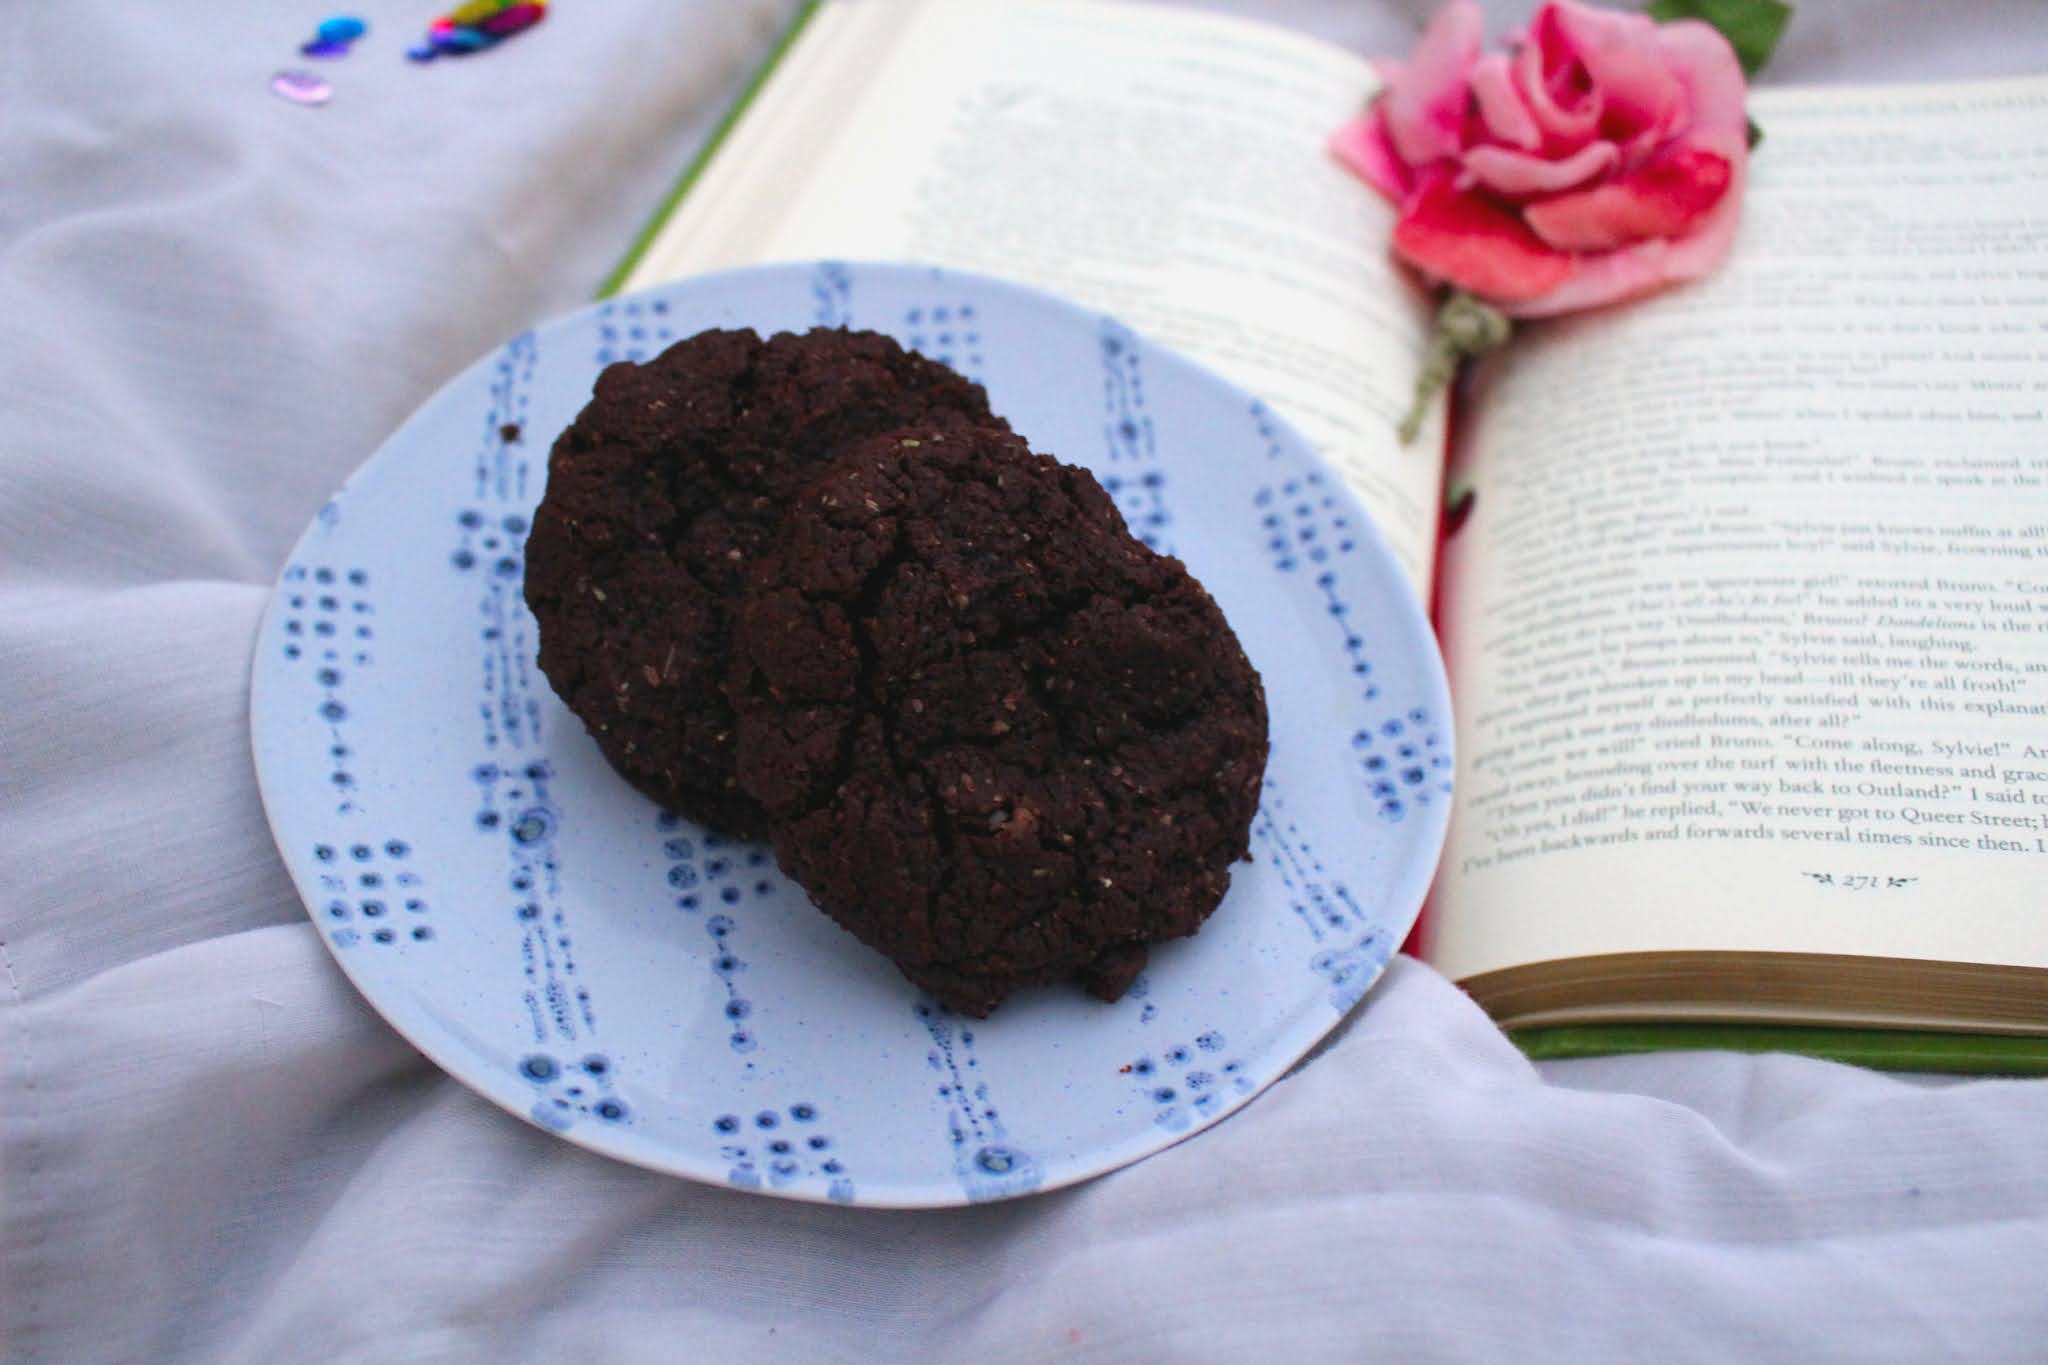
These high in protein brownies are sure to please even the toughest of critics! They are so chocolately and fudgy you won't believe, they're made of chickpea water!


Aquafaba PB Vegan Brownies

12


Ingredients

180g dark chocolate (I used semi-sweet chocolate chips)

2/3 cup peanut  butter

1/3 cup soy milk

1/2 tsp almond extract

1/2 cup aquafaba

2/3 cup brown sugar

1/3 cup whole wheat flour

1/3 cup cocoa powder

1/2 tsp cinnamon

1/4 tsp salt

peanuts and chocolate chips for add-ins or toppings


Directions

1. Preheat oven to 370F. Prepare an 8x8 inch baking dish (mine is non-stick and was fine but you may need parchment paper and/or some oil)

2. Beat aquafaba until foamy and then slowly add in brown sugar. Keep beating until soft peaks formed. I used a handheld mixer and this took maybe 10 minutes. If you have a food processor or stand mixer this will be a lot better to use. Set aside.

3. Melt chocolate in a double broiler or microwave in a microwave safe bowl in 40 second intervals. I took mine out each time and stirred until it was ready and melted. I recommend using a large bowl as you will need to add more ingredients to the chocolate mixture but if you don't have one then just be prepared to transfer the chocolate mixture to another bowl.

4. Once chocolate is melted and smooth, stir in peanut butter and almond extract into chocolate. Then stir in soy milk slowly.  

5. In another bowl, mix flour, cocoa powder, cinnamon, and salt and then stir these dry ingredients into your chocolate mixture.

6. Next, fold in 1/3 of aquafaba mixture until combined and mixture looks lighter. Then in sections as you see fit (I did it 3 times you could do it all together but I find that a little hard) fold in the remaining aquafaba. until just combined, mixture should look glossy and thick.

7. Fold in the peanuts and chocolate chips now if you like or add them on top afterwards. 

8. Spread mixture evenly in your prepared pan and top with some peanuts and chocolate chips if desired.

9. Bake for 20 minutes until edges look browned and top is set, middle should still be a little fudgy

10. Allow to cool before cutting into squares and serve


Adapted from here

January 25, 2021

Matcha Azuki Bean Buns

6:21 PM 1 Comments

I had these beans and matcha just waiting for the perfect opportunity! If you're into Asian desserts like me then you'll  absolutely love these matcha buns! I can't believe it took me so long to make something like these.


Azuki beans are used in many Asian desserts. They are tiny red beans that taste so good sweet. I found them at a Korean supermarket but you could find them at any Asian food store and I wouldn't be surprised if many grocery stores with an international foods sections carries them.

I was inspired to make these from Seonkyoung Longest's Youtube Matcha Cinnamon Rolls video. She made a yeasted version and if that is up your alley then it is a great option! I decided to make the recipe my own by using my Yeast Free Super Cinnamon Rolls recipe. Nothing against yeast but sometimes it is just so nice and easy to not have to worry about it. I regularly make my own yeast free cinnamon rolls and thought it would be great to change up the recipe.

I would suggest making the anko bean paste the day or evening before as they will take over an hour to make. I know that sounds intimidating but you will just be letting the beans sit most of the time and have nothing to do but wait. I adjusted the recipe from here and suggest checking it out if you need some more direction on making the anko as they have step-by-step pictures. 

As I said before, I made the anko the night before and then stored in the fridge overnight at first I was worried they were too sweet but once they have serves their purpose as a filling for the cinnamon rolls, then they are perfect!

These matcha buns are wonderfully tender and just the right amount of sweet. The anko really shines through with the matcha and I think there is a great matcha taste to it. I added some green food coloring to get a better green color but that is entirely optional. 


Matcha Azuki Bean Buns

Makes 9


Ingredients

For anko:

200g azuki beans

3/4 cup sugar

water

1/2 tsp salt

2 tbsp cornstarch

1/4 to 1/2 cup water

almond extract

cinnamon


For rolls:

1 cup cashew milk (or milk of choice)

2 tsp apple cider vinegar

1 tsp almond extract (or vanilla)

6 tbsp grapeseed oil (or other oil)

1 1/2 cups whole wheat flour

3 tbsp sugar

1/2 tsp baking soda

1 1/2 tsp baking powder

2-4 tbsp matcha

4 tbsp cornstarch

2 tsp cinnamon

1/2 tsp salt

More milk and flour if needed

Green food coloring (optional)


For filling:

1/3 cup coconut oil, softened

About 3/4 or more of your prepared anko


For icing:

1 cup icing sugar

2 tbsp cashew milk 


Directions

For anko:

1. Measure out 200g of azuki beans, rinse and drain beans in a colander

2. Place beans in a pot and cover with water until it is a couple inches above the beans. 

3. Place on your stovetop and turn heat on to high and bring water to boil

4. When water has reached a boil, discard the water through a colander and then place beans back into the same pot

5. Add fresh water a couple inches above the beans

6. Bring water to boil again and this time cover with a drop lid or a lid that is slightly open over the beans to keep them from jumping to much.

7. Turn hear down to medium-low and and simmer for 1 to 1.5 hours. 

8. Water will evaporate so keep an eye on your pot and add more as necessary

9. After an 1 hour, test beans by picking one up and tryin to mash it with your fingers (make sure bean is cooled). If you can mash it, the beans are done but if not cook for an additional 30 plus minutes until they are ready 

10. Place beans back into pot and turn heat to medium-low. Add half the sugar

11. Mix well and once dissolved, add the rest of your sugar

12. Continue to cook while stirring constantly

13. Add in the cornstarch, water, cinnamon (optional), and salt. Mix until combined and cornstarch begins to make it thick

14. At this point you can begin mashing the beans while the heat is still on. I used a potato masher and just kept mashing until I got the consistency I liked. For me I wanted some of the beans to still be there but also some spreadable. You could also put it into a food processor if you want it all smooth

15. Take beans off heat and place into a storage container to allow to cool before you use them for your filling


For cinnamon rolls:

1. Preheat oven to 400F and grease an 8x8”baking dish with coconut oil

2. In a small bowl, combine the cashew milk and apple cider vinegar. Whisk and leave to sit for 15 minutes, until curdled.

3. Whisk in almond extract and oil then set aside.

4. In a large bowl, sift in the flour, sugar, baking soda, baking powder, cornstarch, matcha powder, cinnamon, and salt. 

5. Create a well in the middle and pour your wet mixture in. Gently fold and combine to form a soft biscuit like dough. Add in a little more flour or milk if necessary.

6. Flour your working surface and place your dough onto it. Fold dough over a couple times to make sure it’s all together.

7. On your surface, roll the dough into a rectangle measuring 10x10 inches.

8. Spread coconut oil all over the surface of the dough and then spread anko on top

9. Roll your dough the long way and then seal the ends. Cut into 9 pieces to form the rolls.

10. Place rolls about an inch apart on your prepared baking tray. Bake for 15-18 minutes or until golden.

11. While your rolls are baking, prepare the cream cheese frosting by creaming together all ingredients. It will be a little runny

12. Remove rolls from the oven and cover with the icing. Let cool and then enjoy!


I may have stolen one :P


November 27, 2020

Double Dark Chocolate Cookies

6:05 PM 0 Comments


This is another recipe adapted from Babycakes! I am loving re-discovering this cookbook

I can't say enough about these cookies because they are absolutely phenomenal!

Honestly the first couple times I ate them I was like "omg these are so good! did a I actually make these? what did I put in them, crack?!"

They are sooo tasty and I have already made them a couple times! I think they're perfect for a treat to go with your lunch or an evening snack. The flax meal adds such a nice texture, nuttiness, depth to the cookies that I love so don't skimped on that!

I love the addition of cinnamon as I think it adds and extra kick and brings out the flavor of the chocolate more. However, you don't need to add it if that isn't your thing.

I love these cookies! And love that they're better than anything you can buy at the store but way healthier too!


Double Dark Chocolate Cookies

Makes about 24 


Ingredients

1 cup coconut oil, softened

1/3 cup apple sauce

1 1/4 cups sugar

1/2 cup cocoa powder

1 tsp salt

1 tsp cinnamon

1 tsp almond extract

1/4 cup flax meal

1 tsp baking soda

1 cup chocolate chips

almond milk if needed


Directions

1. Preheat oven to 350F. Prepare a baking sheet with parchment paper

2. Blend together coconut oil, apple sauce, and sugar with a hand mixer or your preference of tool until well combined and creamy. 

3. Stir in cocoa powder, salt, cinnamon, almond extract, flax seed meal, and baking soda until combined. If mixture is too thick then you can add a little bit of almond milk here to help you combine

4. Stir in chocolate chips and then scoop tablespoon sized portions of cookie dough onto your baking sheet.

5. Bake for 10 to 14 minutes until cookies are lightly brown on the edges and cookies are set in the middle.


November 5, 2020

Gooey Extreme Chocolate Gluten Free and Vegan Brownies

8:53 PM 0 Comments


Hey all! Today I have these super amazing brownies! These are so chocolately, dense, and just between fudgy and cakey.
I adapted the recipe from Babycakes. I love this recipe book and just recently re-discovered! It had gone missing for a while. Everything is vegan and gluten free and made with mostly pretty healthy ingredients. In my philosophy I don't feel like I always need to make everything 100% all natural or healthy (for example these still use sugar) but if they can be a little healthier and I know what's going into it then it's a win!

I have even actually been to this bakery in NYC! I still remember walking all through China Town and the streets of the city to get there. The bakery was cute and small from what I remember. I actually can't remember what I ordered there as this was a few years ago. I feel like either my friend or I did get something with blueberry and possibly a brownie. I may have to dig through my photo files to find it. This bakery is now called Erin McKenna's Bakery. If you ever find yourself in NYC go check it out! 


I do highly recommend this cook book and her bakery! I made this recipe into my own to fit more what I wanted and and the ingredients I had on hand. I think they turned absolutely amazing!
The batter smells strongly of the flour but once it's baked you don't notice the taste or smell at all! I wouldn't be able to tell that these are gluten free at all. They hold up really well and have a deliciously chocolately taste that you would expect from brownies! I highly recommend these for someone who needs a gluten free treat!

Gooey Extreme Chocolate Gluten Free and Vegan Brownies

Ingredients

1 cup yellow lentil flour (I think you could use another bean based gluten free flour too)

1/4 cup cornstarch 

2 tbsp arrowroot powder

1 cup sugar

1/2 cup cocoa powder

2 tsp baking powder

1/4 tsp baking soda

1/4 tsp guar gum

1 tsp salt

1/2 cup grape seed oil (or coconut oil)

1/2 cup applesauce

1 tsp vanilla extract

1/3 cup coffee (I used instant hazelnut coffee)

1 cup chocolate chips


Directions

1. Preheat oven to 325F. Lightly grease and/or line and 8 by 8 inch square inch pan if needed

2. In a medium bowl mix together flour, corn starch, arrowroot, cocoa powder, sugar, baking powder, baking soda, guar gum, and salt

3. Add oil, applesauce, vanilla, and coffee then stir batter until smooth

4. Gently stir in chocolate chips

5. Pour and smooth out batter in your pan

6. Bake for 25 minutes or until brownies are set on sides and toothpick inserted comes out mostly clean. I like to have mine feel a little gooey when I take them out

7. Let brownies set in pan for about 10 minutes before you cut and serve them

8. Store in fridge, I love eating these cooled from the fridge but they also taste super good warm or heated up! So whatever your preference is!

June 29, 2020

Lemon Poppy Seed Cake with Blueberry Filling (vegan option)

8:58 PM 0 Comments
Hope everyone is having a lovely summer so far! I made this amazing and beautiful 4 tiered cake for my birthday this month! I think this may be the first time I made a 4-tier cake so it is very special to me!


This cake is showstopping with it's high layers and colorful cake and fillings! It will be great for a special occasion or nice afternoon tea. It is also surprisingly easy to make if you have a little bit of knowledge in baking.
My suggestion would be to make the blueberry jam the night before then the cake the nest day.  You could make the frosting on either day but I liked making it on the same day as the cake as it was cooling in the fridge. I highly suggest making the cakes and then saran wrapping them once cooled to place in the fridge for a couple hours as this will make it a lot easier to cut and add your fillings. 
You could make this 4 tier or just leave as a two tier if you like as well. You could even half the cake recipe if you don't need so much cake. This would give you one cake to bake and cut in half if desired. 
I made some lilac sugar a couple days before to put on top of my cake for a nice decoration and some floral notes. If it's lilac season for you this might be something you like to try! This isn't necessary and may make your cake a little messy but I thought it was a nice touch. For my lilac sugar I placed about 1/2 cup of fresh, cleaned, and patted dry lilacs in about 1 and a half to 2 cups of sugar. Then I left it for a couple days, making sure to shake everyday. If you don't shake then the sugar will stick together! I made this mistake one year and it wasn't fun. You should be able to leave the crystallized lilacs in the sugar or you could also strain them out.
You can check out where I adapted this recipe from here. Please check it out as the author gives some great detail about why she used certain ingredients. 
I love lemons, poppy seeds, and lilacs so I felt like this was the cake for me on my birthday! It turned out incredible and have rave reviews with those I shared it with. 
Best of all this is a pretty healthy cake! I used whole wheat flour and olive oil which are both excellent substitutions to make something sweet a little healthier. There is still quite a bit of sugar in this so to make it even healthier you could try coconut sugar or another sweetener.

The cake is layered with a homemade blueberry chia jam and cream cheese frosting. The blueberry jam is soooo good! I would highly suggest doubling it so you have more to put on your cake than I did. I ran out of jam (*cough* wasn't paying attention) to put on the last layer and I also think the putting some extra jam on the others wouldn't hurt. You could also layer with a different type of jam if you like. Honestly though if you have extra, I don't think that would be an issue as you'll definitely eat it with something else. 
For the cream cheese frosting, make sure you use vegan cream cheese and coconut oil (as I did) or vegan butter if you wish to make it completely vegan. You could also make a different type of vegan vanilla frosting and I think that would be great. 


Lemon Poppy Seed Cake with Blueberry Filling


Blueberry Jam
3 cups blueberries (I used frozen)
1/2 tsp ground ginger
2 tbsp maple syrup
2 tsp lemon juice
1 tsp lemon zest
2 tbsp chia seeds

Cake
1 2/3 cup almond milk
1/2 cup lemon juice (3-4 lemons)
3 cups whole wheat flour
2 tsp baking soda
1/2 tsp salt
1 1/2 cup sugar
2 tbsp lemon zest
1/2 cup olive oil
1-2 tsp lavender extract
1/2 tsp almond extract
4 tbsp poppy seeds

Cream Cheese Frosting
1/2 cup coconut oil
1 cup (8 ounces) cream cheese
1 tsp elderflower drink concentrate
4 cups powdered sugar


Directions

Jam:
  1. Place blueberries, ground ginger, maple syrup, cinnamon, and lemon juice in a saucepan on high heat. Bring mixture to a boil. This may take a few extra minutes if you're using frozen berries. 
  2. As the mixture cooks, pop any berries that you need to with the back of a wooden spoon. Stir frequently
  3. Cook for about 10 minutes. This may be shorter or longer depending on if you used frozen berries and how much you used. The jam should have reduced and thickened a bit
  4. Remove from heat and stir in chia seeds to thicken. 
  5. Once jam has cooled, you can move to a container to store in the fridge until you're ready to use it
Cake:
  1. Preheat oven 350F. Grease and line two 9 inch cake pans (you can use a different size but remember to adjust bake time)
  2. Zest lemons until you get 2 tbsp of zest. Juice lemons until you get 1/2 cup juice.
  3. Stir almond milk and lemon together in a bowl and allow to curdle for a few minutes
  4. In a large bowl, stir flour, baking soda, sugar, and salt. Pour in milk mixture and stir.
  5. Next stir in olive oil, zest, lavender extract, almond extract, and poppy seeds until combined. Do not over mix
  6. Pour batter evenly into you cake pans. If you only have one like I did then you'll have to bake, allow the first to cool, and then bake your second.
  7. Arrange cakes in middle of oven and bake for 30-35 minutes until cakes are lightly golden brown and a toothpick comes out with a few moist crumbs
  8. Remove from oven and allow cakes to cool in the pan for 10 minutes. Then remove from pan to allow to cool fully
  9. Once cooled, wrap cakes in plastic wrap and store in fridge
Frosting:
  1. To a large bowl, add in coconut oil and cream cheese. Beat on low until mixture is creamy
  2. Gradually add in powdered sugar, lemon zest, and elder flower concentrate then beat until smooth and creamy
Assemble
  1. Slice your two cakes in half horizontally. I did this by placing my cake on a flat surface and then with one hand on top, slicing through with a serrated knife. This can be a little tricky if you've never done it before. Make sure to keep the knife as straight as you can and if your knife isn't long enough, then you may need to twist your knife or turn your cake to get every edge
  2. Place one of your quarters on to your plate, spread some cream cheese on the cake and then spread your jam on top of that
  3. Place next cake layer on top and then do the same to this layer
  4. Now place one more layer and do the same. For this layer I ran out of jam so I drizzled some elder flower concentrate to add something
  5. Place your last cake on top and with any cream cheese or jam, you can decorate as you like. Top with lilac sugar if using
  6. Slice cake and enjoy!


May 11, 2020

Chocolate Banana Pie Squares (vegan, gluten free, refined sugar free)

3:31 PM 0 Comments

These bars are amazing! I love the filling because it is just bananas! (pun intended)
They are such a great healthy alternative for any chocolate or banana dessert.
The crust is chocolately and delicate. The filling is packed with banana flavor and so creamy!
They taste just as creamy and maybe even more delicious than your average banana pie. Plus they are gluten free, vegan, and free of refined sugars! I could barely notice myself that they were healthy when I tried them because I really felt like I was indulging!
I adapted them from here and didn't realize until after I finished making them that the creator suggested not using coconut flour. I thought the coconut flour was great though and not dry at all! It also stayed well together after it completely cooled.
I thought they tasted really good warm (if you're ok with the crust falling a part a little) but also awesome at room temperature or cold. If you eat them cold, it gives a more banana pie texture.


Chocolate Banana Pie Squares
Adapted from here

Crust
2/3 cup coconut flour
1/3 cup cocoa powder
1/2 tsp cinnamon
1/4 tsp salt
1/3 cup peanut butter
4 tp 6 tbsp almond milk

Filling
3 bananas (at least 1 cup mashed)
1/4 cup peanut butter
1/2 tsp cinnamon
1 tsp almond extract
almond milk if needed
1/2 cup peanuts
1/3 cup chocolate chips

Directions
1. Preheat oven to 350F and prep a 8x8" square pan
2. Combine all ingredients for crust in a bowl. Add more almond milk if needed so that the dough sticks together when you squish it
3. Press dough into you pan. It may not look like you have enough at first but keep spreading and squishing!
4. Combine all filling ingredients in a food processor except peanuts and chocolate chips
5. Blend until creamy and smooth. Add extra almond milk if needed to help blend (for example if you're using frozen bananas)
6. Add in peanuts and chocolate chips. I like to pulse them into the mixture in my food processor but you could also stir them in
7. Pour over crust and smooth out
8. Bake for 30 to 40 minutes until filling is set and lightly golden brown on the sides
9. Allow to cool for a few hours or chill. You could eat it warm right away if you want but the crust most likely won't stay together. It still tastes good though!

April 24, 2020

Deadly Double Chocolate Cookies

1:01 PM 0 Comments

These double chocolate cookies are perfect for when you have an intense chocolate craving! You will not regret making these when the moment arises.

Finally we have some nice weather and I can take photos outside! I much prefer the outdoor lighting since I only use natural lights in my photos. I don't have any fancy light equipment yet and I honestly think natural light is the best when the conditions are right!

They have a chewy and soft texture as well as a deep chocolate flavor thanks to the abundance of cocoa powder. They're also vegan!

You can omit the cinnamon if it's not your thing but I love the sweetness and delicate spice that cinnamon gives!

Deadly Double Chocolate Cookies
24

1/2 cup brown sugar
1/4 cup white sugar
2/3 cup grapeseed oil (or other oil)
1/4 cup almond milk
1 tbsp cornstarch
1/2 tsp baking soda
1/2 tsp salt
1/2 tsp cinnamon
1 tsp almond extract (or vanilla)
1 cup whole wheat flour (or other flour)
1/2 cup cocoa powder
1/2 cup chocolate chips


1. Preheat oven to 350F and line a baking sheet with parchment paper
2. Combine brown sugar, white sugar. oil, milk, and cornstarch in a bowl. Whisk or blend until combined and creamy. Mixture will resemble a thin caramel. When you pick up the whisk, ribbons of the mixture should remain on top for a second.This mixture doubles as your binder so make sure you don't get lazy and mix it well!
3. Add in baking soda, salt, cinnamon, and almond extract then mix to combine
4. Create a well in your mixture then stir in flour then stir in cocoa powder until combined
5. Mix in chocolate chips

April 14, 2020

Matcha Elderflower Loaf Cake (gluten free, vegan)

12:36 PM 0 Comments


Hey guys! I hope you're doing well. It's almost spring time!

I'm so excited that days are getting longer and the weather is getting warmer. Where I live we still get snow sometimes but I've been able to go on some bike rides already!
I know there's not much to do in this time of physical distancing so going out for some fresh air has been a priority for me. Just make sure you maintain distance from others and if you touch anything to wash your hands and clean your clothes.

This new cake recipe is perfect for spring! It's floral, energizing, and sweet! 
I used a gluten free flour blend which made the cake taste more rustic (also had some trouble keeping it together so be careful!) but you can use any flour!

You can skip the elderflower if you don't have any or use something else but I love elderflower! I get the drink concentrate from Ikea. I think the elderflower and green tea balance each other nicely too. You get the sweet floral elderflower and the sweet, creamy, and slightly bitter matcha. It makes for a killer combination!
I also love the taste of green tea and matcha so I put tons in! You can put more or less in depending on your taste but I'm guessing that if you're reading this recipe then you love green tea too so you will appreciate this recipe!


Matcha Elderflower Loaf Cake

Ingredients
3 tbsp ground flax seed mixed with 9 tbsp water, allow to sit
1 cup almond milk
2 green tea bags
2 1/4 cup gluten free flour blend (I used a quinoa flour blend, you could also use all-purpose if you're not gluten free)
1/2 cup brown sugar (or coconut sugar)
1/4 tsp cinnamon
1-2 tbsp matcha powder
1/4 tsp salt
2 tsp baking powder
1 tsp baking soda
1/2 tsp vanilla
1/4 cup maple syrup
1/4 cup elderflower drink concentrate (or more maple syrup)
2 tbsp vinegar
1/3 cup melted coconut oil
1/2 cup shredded coconut (optional) plus more for topping

Directions
1. Preheat oven to 350F. Grease and/or line a 9x3 loaf pan
2. Gently warm almond milk and then steep your two green tea bag in it for about 10 minutes
3. Mix flour, brown sugar, cinnamon, matcha powder, salt, baking powder, and baking soda together in a large bowl
4. Add in flax seed mixture then maple syrup, elderflower concentrate, vinegar, and coconut oil one at a time. Gently mix together
5. Fold in coconut
6. Pour mixture into loaf pan
7. Bake 35-45 minutes or until a toothpick comes out clean
8. Allow to cool then slice

April 6, 2020

Healthy Ancient Roman Cheesecake

1:23 PM 0 Comments
Yes this recipe is from Christmas don't judge

This cheesecake is not only healthy but historic! It is based off an ancient Roman cake called Savillum! I based the recipe from this one so check out that link for more history of the cake!  It is made with ingredients that you would have found way back in ancient Rome. This includes cottage cheese, honey, and poppy seeds.

You may use ricotta instead of cottage cheese. I think this would be more smooth with ricotta but also ricotta is way more expensive! I thought it was still amazing and smooth with cottage cheese.
I made this for a Saturnalia party and the only photos of the whole cake I took were on my phone but I think they turned out ok!

Even though this cake is made with pretty natural ingredients, it is rich! You only need a small slice to feel happy and satisfied.


It is made with ay healthier ingredients than your typical cheesecake.

Honey- a natural sweetener which is gentler on your body than sugar. It does not spike insulin levels which may lead to eating more later. It is also sweeter than sugar so you need to use less therefore less calories!
I felt like my cake was almost a little too sweet so you may want to add less or be careful on how much you add

Cottage cheese- less fat and calories than cream cheese

Poppy seeds (optional)- rich source of calcium, iron, and magnesium. Can relieve exhaustion and anxiety

Whole wheat flour- more fibre an nutrients which keeps you fuller for longer

Obviously I added some non-traditional ingredients like the vanilla and cinnamon but I thought these made it taste even better!


Healthy Ancient Roman Cheesecake
12-24 servings

Ingredients
3 1/2 cups cottage cheese
3/8 cup honey plus 3/4 cup
1 1/4 cup whole wheat flour
1 egg
2 tsp cinnamon
1 tsp vanilla extract
1/8 tsp salt
poppy seeds

Directions
1. Preheat oven to 350F. Prep an 8" springform cake pan
2. In a bowl, combine all ingredients except the 3/4 cup honey and poppy seeds
3. Pour into your cake pan and bake for 1 hour and 40 minutes until cake is firm
4. Poke some holes with a fork on top of your cake and pour the rest of your honey on top
5. Sprinkle with poppy seeds
6. Return to oven and bake for 10 additional minutes


COPYRIGHT 2020 KATCUPCAKE.COM